|
Item No.:CH120802-NV
Radiator Pressure Tester & Vacuum Type Cooling System Kit (25PCS)
Description:
* Set for testing leaks in automotive cooling system and refill new coolant by creating a vacuum in cooling system.
* Includes various adapters for major vehicle brands on market
* Adapters and pump are made of light weight nylon 6-6
* Connectors(blue and black) are for testing pressure caps
* Includes a thermometer for extra safety
Specification:

Operation:
- Create a vacuum in the cooling system
- Drain coolant from the radiator
- Hook the gauge underneath the car’s hood
- Connect shop air to shop air connector(B)
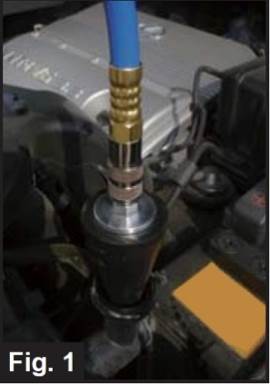
- Connect the conical adapter(8) or a suitable test cap(5 or 6) onto the radiator filler neck(as in Fig.1)
- Turn on the air switch (C) and air control valve(E), while coolant control valve(G) remains off, to create a vacuum in the cooling system(as in Fig.2)
- When the pressure falls into the range between -50 and -60 cmHg (-20 and -25inHg), turn off the air control valve (E) and then air switch(C)
- Leave the gauge on the radiator for approximately 10 min to check if there are leaks in the cooling system before refilling new coolant.
 
- Refill New Coolant
- Connect the coolant hose(10) to the coolant hose connector(H).
- Put the hose into a container filled with pre-mixed new coolant.
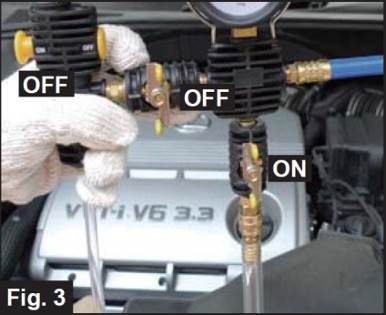
- Turn on the coolant control valve(G) (while the air control valve(E) and air switch(C) remain off), coolant will be introduced into the radiator immediately (as in Fig.3).
- The refilling process is completed when the gauge reads zero.
- Remove residual coolant in the gauge before storage.

Cooling System Pressure Test
- Choose a suitable adapter and screw the adapter onto the radiator filler neck.
- Connect the pressure tester to adapter.
- Pump pressure to the range between 10 and 15 psi (Fig.4).
- Check if the gauge reading moves.
If it does, there could be leaks in the cooling system.
Attention: Don’t pump the pressure up to 35psi.

Radiator Cap Pressure Test
- Connect the original radiator cap to one side of the connector, and a test cap on the other side (Fig.5)
- Pump pressure to specified pressure on the cap.
- When pumping pressure under the specified pressure, check if the gauge reading drops. If it does, there could be leaks on the cap.
- When pumping pressure above the specified pressure, check if the radiator cap has the ability to release pressure. If it does not, the cap should be replaced.

|